The Regenfarming.news summary:
Importance of Soil Health: Soil health is critical for sustainable agriculture, but traditional lab tests can be expensive and time-consuming. Farmers can perform several simple, on-site tests to assess soil health without needing lab analysis.
Key DIY Soil Tests:
- Soil Structure Test: Check for good crumb structure; hard clumps indicate poor health.
- Soil Smell Test: Healthy soil should have a sweet, earthy smell.
- Root Growth Test: Assess root depth and density; poor growth suggests compaction or lack of soil life.
- Earthworm Count Test: High earthworm activity indicates healthy soil.
- Earthworm Food Test: Ensure ample organic matter on the surface and in the soil for worms to thrive.
- Soil Color Test: Darker soil indicates higher organic matter content.
- Dung Beetle Activity Test: Presence of dung beetles and earthworms in cow pats is a sign of healthy soil.
- Sub-soil Compaction Test: Use a metal rod to check for compacted layers that restrict root growth.
- Rainfall Penetration Test: Test how quickly water is absorbed by the soil to assess structure and compaction.
- Soil Coverage and Plant Diversity Test: Diverse plant coverage protects soil and promotes microbial activity.
- Soil Minerals Test: Indirectly assess mineral balance through soil structure and worm activity.
- Soil Acidity Test: Test pH levels, ideally aiming for slightly acidic soil (pH 6.5).
- Microbe Presence Test: Healthy soil should be rich in microbes, essential for plant health.
- Brix Test: Measure plant sugar content to gauge overall plant health and soil fertility.
Why wait for a lab, why pay for soil tests when YOU can do them on the spot. Whether you are just starting your regen ag journey or want to monitor your progress, see 15 tests YOU can do in the paddock.
There are also quite a few things or ‘tests’ that you can establish for yourself – the reasons for doing these will become more evident as we progress. However, there is no one test that can be carried out or measurement taken to suddenly achieve soil health. Indeed many of the things advocated by the scientific community and agricultural authorities as well as chemical and some farm machinery companies in the past, even if well intended, have combined to cause much of the soil degradation that is so prevalent today.
There are however simple ‘tests’ that a farmer personally can readily carry out at various points on the farm without expensive equipment or having to send samples to a laboratory for ‘analysis’ to see if the soil is healthy or has any soil issues likely to contribute to ongoing soil degradation. It is strongly recommended that as many of the following tests as possible be carried out in the near future and the results recorded including photos where possible. These tests can be repeated periodically to monitor progress.
Soil Structure Test:
Soil structure is important on so many fronts. Take a big shovelful of soil and look if the soil has a good crumb structure, that is, does it have lots of aggregate formations and air space. If not and it has lots of large hard clumps or clods, it is lacking in health.
Soil Smell Test:
A university in America undertook a study to try to establish if there was a simple test for soil health. What they found was that the smell of soil was the best single indicator if one is wanted. Take a handful of soil and smell it. If it is sweet smelling and has a beautiful earthy smell it is highly likely that it has something good going for it. If not or it smells ‘off’ or sour there is likely a problem.
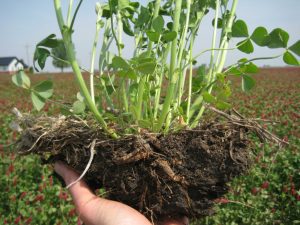
Extent of Root Growth Test:
The extent of root growth will give some indication of how well the soil is affording the plant the opportunity to capture what the soil has to offer. Dig a hole about 300mm square and 300mm deep (but only inserting the shovel on 3 sides) and place the excavated soil on a ground sheet or in a large container. Check the amount and depth of roots. Look at the sides of the hole including the one where the shovel wasn’t inserted and see if there is abundant root growth and how deep the roots go. If the roots don’t go deep and / or there is not much root growth, the soil is likely lacking air and life.
Plant Root Structure and Depth Test:
Different plants have different growth habits including some that have masses of roots, some that have deep taproots and others that spread laterally. Having such a variety helps to condition the soil and access moisture and minerals etc in different parts of the soil profile. If there is limited variety, the extent of the soil profile being accessed and benefited by root growth will also be limited. Look at the root structure, depth and variety in the excavated soil to see if, as well as the main roots, there are lots of fine off-shoots and good depth for accessing moisture and minerals from deeper down. Very healthy soil will help plants establish a rhizosphere around roots (which look like ‘dreadlocks’) basically concealing the individual roots. Further, if mycorrhizal fungi are present (not visible to the naked eye) they will help to extend the area and volume of soil from which moisture and nutrients can be drawn. If the soil has a history of being periodically plowed and / or lots of chemicals have been used, it is highly unlikely that there will be any mycorrhizal fungi to enhance plant growth. If the amount of the plant growth (roots) below the surface is limited, the soil is likely limited. A greater volume of organic matter, especially of roots of a wide variety of growing plants, will help to build soil carbon that ultimately helps to increase the depth of topsoil by natural processes in much shorter time than previously thought possible.
Earthworm Count Test:
Earthworms are fundamental to the health of soil on so many fronts so the numbers of earthworms and the extent of their activity will give an indication of soil health. Break up the soil that has been removed and count how many earthworms there are. Take care to tease the roots apart as earthworms love being immediately under the crown of plants and high up in the root mass. If there aren’t about 20 – 30 worms, the soil is either too dry at present or is not as healthy as it could be (it is possible to improve soil so that earthworm numbers exceed 100). Is there any evidence of worms having tunneled through the soil or having laid cocoons or deposited worm casts on the surface? This can be an indication of worms having been active in the recent past even if none are evident currently (in dry conditions worms will often roll themselves up in a ball and slowly release moisture from their bodies to keep them alive but once soil moisture returns they will ‘wake up’ again). If it is obvious that they have been active in more recent times, once conditions improve with moisture to hydrate them and organic matter for them to eat, cocoons will soon hatch, grow and multiply thereby aerating the soil and enhancing its mineral content as they move through the soil. Plant roots will tend to follow worm tunnels which will be lined with rich mucous from the worms. Worm casts deposited on the soil surface are the best natural fertiliser known and ultimately help to build soil humus. Earthworms have a gland that excretes small particles of calcium which help improve soil acidity. Earthworms also create humus 4 times more rapidly than normal decomposition. What comes out their rear ends is a fertiliser that is 10 times richer in potassium, contains 7 times more nitrogen, 5 times more phosphorus, 3 times more magnesium as well as beneficial organisms.
Don’t be concerned if you don’t find many or even any earthworms initially – once you start to do the things mentioned in this document, it is amazing how they will start to appear. After you read some of the documents in the links provided about what earthworms do for the soil health, you will appreciate how important they are and why monitoring their numbers is such a good indication of where soil health is up to on your farm and where it is heading.
Earthworm Food Test:
There are various types of earthworms, some sourcing organic matter from the surface which they draw down into their tunnels to consume while others consume microbes and other organic matter in the soil. They serve different purposes and have different habits in the soil and on the surface. Healthy soil will have high numbers of earthworms. The more food they have to eat, the more they will reproduce and the more they will improve your soil. Select a representative 300mm x 300mm area and see how much dead organic matter there is on the surface. Now dig the soil below it out to a depth of 300mm. Does it contain much organic matter and plant roots? If not, there will be limited matter to be broken down to feed soil life such as worms and microbes and ultimately feed the plants.
Soil Colour Test:
Soil colour is partly an indication of its parent material and partly due to how the soil has been managed. Look at the colour of the soil. If it is light in colour it is very likely lacking in organic matter and / or minerals. As soil health improves, the soil will become darker. And conversely, soils that have been darker in colour will become a lighter shade if soil carbon is released into the atmosphere by plowing and use of chemicals.
Cow Pat Condition / Dung Beetle / Dung Worm Activity Test:
Cow dung (and urine) have potential to greatly benefit the soil if the cattle graze healthy plants grown without chemical fertilisers, herbicides and pesticides as the dung will then start to attract dung beetles and dung worms to draw dung down into the soil. If cattle are run on the property, locate some fresh cow pats and look for signs of any current dung beetle activity (there are many species of dung beetles and having a good variety will help to ensure year round activity). If there are no fresh cow pats, do older ones look like they have been broken up by something? Or does it look like the surface has been undisturbed and set hard? Now break the cow pat up – do you see any earthworms in the dung? Now carefully remove the cow pat, completely exposing the soil below – do you see any holes in the surface of the soil? Smaller holes can be evidence of dung worm activity while larger holes could be where dung beetles have taken dung down into the soil to breed in. Such activity also takes organic matter into the soil and helps provide lots of tunnels for air and water to penetrate. If the cow pat is still intact and gone light grey and hard on the surface it likely means it is merely oxidising and will do little to help improve the soil. The healthier the soil and pasture, the more the resultant healthy dung will attract dung beetles and dung worms to quickly incorporate the residue into the soil as part of the carbon cycle.
Sub-soil Compaction Test:
If the sub-soil has developed a compacted layer, most roots will not be able to penetrate it as it will contain no airspaces for the roots to grow through thereby greatly limiting the amount of soil that roots can access and greatly increasing the chance of water-logging and surface erosion. Now check for sub-soil compaction or the existence of a hardpan just below plow depth. If you have a penetrometer use it, otherwise take a metal rod about 10mm in diameter and hammer it into the soil with gentle to moderate blows. If it penetrates easily for say the first 50mm – 200mm but then takes considerable effort to drive it in the next 100mm – 200mm before becoming easier again, then it is highly likely there is a hardpan or compacted layer with very little or no air in it. This will prevent most plant roots from penetrating further than the first 50mm – 200mm to access moisture and minerals deeper down. While deep ripping can bring a short term improvement, it is expensive, probably won’t last and may even make things worse. Longer term improvement in soil health from a range of measures noted herein will eventually help to break up the hard pan and enable plant roots and moisture to penetrate much deeper. In due course this subsoil area will improve and become more like topsoil (this is a cheap way of accessing more soil without purchasing more land). If compaction is evident, it is not only important to work to overcome it but also to minimise further compaction by restricting wheeled traffic over soil especially when soil is wet and by moving animals before they cause any significant pugging in the soil. See further below and also access one of the attached links for ‘Soil Works’ company in America – ‘Correcting the Cause of Compaction’ which sheds new light on a fundamental cause. Soil Works considers soil compaction to be a major limitation on soil health and successful agriculture and outlines an interesting approach to overcome it. Later I will also set out another somewhat similar approach, but with further benefits, that we are trialling with encouraging early results.
Rainfall / Moisture Penetration Test:
If the soil has good structure it will be readily able to absorb rainfall / moisture rather than it running off. Take a metal or strong PVC pipe about 100mm-150mm diameter and a similar length and tap it about 50mm into the soil. Cover the top of the pipe loosely with Gladwrap and pour on to it about 500ml of water representing about 25mm of rain. Then slide the Gladwrap off the pipe and quickly let all the water go at once onto the soil within the pipe (or alternatively simply pour all the water in quickly in one go). Time how long it takes for the water to go completely into the soil. If it takes more than a minute or two it means there is not enough air in the soil and there will likely be run-off and waste in heavier rainfall and risk soil erosion. In a well-structured soil it will likely fully penetrate in less than 20 seconds. If it takes 10 minutes, or worse still over an hour, the soil lacks structure and will not be able to capture much moisture in heavier rainfall events and will be prone to erosion. As soil health improves, rain will penetrate more readily and eventually be able to capture even very heavy and prolonged rainfall. Further, healthy soil will not only enable you to capture more water but also to store it in the soil. As indicated earlier, it is estimated that for every one percent increase in soil carbon, soil will store an estimated extra 120,000 litres per hectare.
Soil Coverage and Plant Diversity Test:
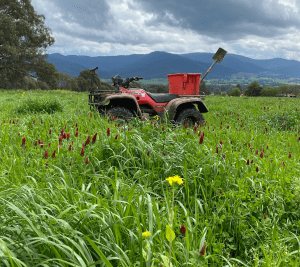
There are many benefits in keeping the soil covered with a high diversity of growing plants and dead organic matter including protecting the soil during periods of heavy rainfall, helping to conserve moisture, keeping the soil cooler in summer and warmer in winter as well as providing dead organic matter for earthworms to eat. Standing dry plant material (that has not significantly oxidised) will enable livestock to balance their food intake by including roughage. Bare soil is best avoided at all times. Growing plants and their living roots in the soil will ensure that plants can exude liquid carbon into the soil as plants photosynthesise. Further, these living roots help to ensure mycorrhizal fungi can continue to survive and expand. The greater the diversity of plants the greater the synergistic effect leading to greater diversity of microbes. Aim for at least 8 but preferably even many more types of plants taking in both broadleaf types and grasses as well as herbs and flowering plants to not only protect the soil surface but to capture sunlight and ensure good photosynthesis. Where possible have both warm and cool season varieties. In due course, seed lying dormant in the soil, perhaps for many years or even decades, will start to reappear as soil conditions favourable to their existence start to occur. Minimise bare soil exposure – check by looking straight down and into (rather than across) the pasture.
Soil Minerals Test:
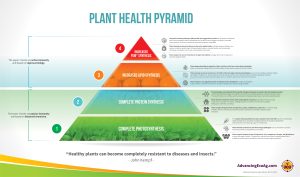
Not all minerals are essential for a plant to ‘merely’ grow and indeed some will ‘grow’ with comparatively few minerals. Year by year however it is being discovered that more and more minerals, including many trace minerals, are required for a truly healthy plant. Further, nature intended that plants uptake many minerals, not just for their own benefit but also for the benefit of the creatures or people that eat them. It is difficult to detect minerals in the soil by eye however if the land has a history of traditional modern farming practices having been carried out, it is highly likely that a considerable number of minerals will be locked up and some ‘heavy’ metals such as aluminium, which has a toxic effect, will have become more soluble in a strongly acidic soil. If the soil has a poor structure, it is also likely that it will be lacking in trace minerals (as well as microbes). Further, because Australian soils are generally very ancient, many trace minerals will have been leached out especially in high rainfall areas. While soil tests can be carried out, they will usually only measure readily available soluble minerals and not those that are merely locked up because of soil acidity or mineral imbalance. Addition of individual minerals risks locking up other minerals because they create an imbalance. However, improving the soil by the various means outlined herein, especially adding a full range sea mineral product, will help to improve lots of things including the soil pH (acidity – alkalinity level) with various benefits as indicated below.
Soil Acidity Test:
Most soils will have a pH level between about pH 4.5 (acidic) and pH 9 (alkaline) with an ideal level for most agricultural purposes considered to be a slightly acidic level of pH 6.5. A pH 7.0 is regarded as neutral while the range is from pH 0 to pH 14. It should be noted that a pH 4.5 is ten times as acidic as pH 5.5 and 100 times more acidic than pH 6.5. Soil acidity itself is worth checking mainly as a means of measuring progress. It is highly likely that the soils will be quite acidic from the outset especially where chemical fertilisers have been used. By improving the issues suggested for testing, you will improve the soil pH. If you don’t actually do a soil pH test, some indication can be obtained by looking at the extent of worm activity – worms do not like soil pH below about 5.0 – 5.5. As measures are taken to increase worm numbers, the worms will help to improve soil pH due to how they improve soil mineralization, especially in how they secrete calcium from a gland in their body.
The traditional way of making a soil less acidic is to apply lime. Applied on the soil surface however, it takes time to work into the soil. Further, it then tends to lock up sulfur which is required by plants. Lime unfortunately also tends to break up or destroy humus (humus is perhaps the holy grail for long term soil health and is something to preserve and strive to increase rather than risk destroying).
Various sea mineral and kelp products are an effective way to amend the pH of a soil. Proper sea minerals provide a full range of 84 minerals all balanced as nature intended and help to bring an acidic soil up towards a more neutral level and a too alkaline soil down to a more neutral level. A cheap and effective way (but not well known) to add minerals to the soil is to apply Olsson’s Liquid Sea Minerals as part of a foliar spray at the same time as putting out worm or compost tea or products such as NutriSoil (which is understood to be made from the mucous of compost worms) and fungal extracts. A highly biologically active, mineralised, healthy soil will maintain a consistent electrical current. It is this current which drives plant growth and as noted later, helps overcome compaction.
Microbe Presence Test:
Microbes are extremely important in the soil food web but will likely be missing in a soil with a history of chemical use and low carbon in the soil. They are so small they can’t be seen with the naked eye but can be seen with a very powerful microscope or alternatively their presence measured with a Soil Microbiome / EC (Electrical Conductivity) Meter. While microbes only live for a matter of weeks, when they die they benefit the soil fertility. Fortunately however they do multiply rapidly if conditions are right, (apparently doubling in number every 20 minutes or so). There are many millions of microbes in just a teaspoon of healthy soil. Microbes do not like very low or very high temperatures. Just like how we use a fridge, which is at about 4 degrees to stop the bacteria growing on our food, the same happens in the soil. On a cold winter’s day when the soil temperature is lower than between 6-10 degrees, microbes are mostly inactive. Microbes’ sweet spot is said to be around 24C. This is why when you add a biological fertiliser like worm leachate or compost tea, it is best to work within the plants’ active growing time when the soil temperature is higher but not too hot. There are lots of soil predators and if microbes have no shelter to retreat to, such as in humus (completely broken-down compost or organic matter), biochar or diatomaceous earth, all of which contain thousands of microscopic cavities, they are prone to be attacked by other soil ‘creatures’. If the soil is not dark in colour it is likely that it is lacking humus that provides shelter for microbes. If biochar and / or diatomaceous earth (DE) are applied (both of which are full of microscopic size holes), they should be inoculated and mineralised first before being applied. Both these things can also be fed to animals mixed with molasses and they will be inoculated as they pass through the animal digestive system. Dung beetles and dung worms will then bury the dung and the biochar and / or diatomaceous earth and the microbes they then contain in the microscopic size holes will have a safe haven when needed and be in the soil to improve its health.
Brix Test:
Brix is a measure of the natural sugar content of plants, vegetables and fruits. A plant functioning at its genetic potential will have high BRIX. The higher the Brix level, the healthier the plant, the more insect and pest resistant it will be and the more nutritious and filling the produce. Once the Brix reading is around 10 or 11 not only will the plant be more nutritious but also it will not be attractive to insect pests (which are basically there to get rid of weak plants). As the BRIX of the plant sap increases, the immunity of the plant increases. Nutrient density, carbon content, and quality have all been directly correlated with BRIX. When a crop is low in carbon, oxygen, hydrogen, and nitrogen, the plant is open to disease, stress and insects. There is some great information about BRIX in a document to be found on one of the link sites attached – ‘Boots in the Dirt’.
Brix is gauged with a Brix Meter or Refractometer which measures the degree to which the natural sugar content causes light to be bent as it passes through a small amount of the juice extracted from the plant, vegetable or fruit. See later for tips on taking effective brix readings.
It is also worthwhile checking soil temperature as the seasons change not just to give you some idea of whether microbes are active as noted above in the ‘Microbe Presence Test’, but also to show the difference in temperature between soil which is bare or has little cover and soil which has a good soil armour – see ‘Soil Coverage and Plant Diversity Test’ above.
Armed with the results from these tests, you will now have an idea of how much potential there is to regenerate your farm and how long it might take. Later you will get an idea of what measures you could take to start bringing life back into your soil.
Useful Testing / Monitoring Equipment
The following equipment will be helpful to test / monitor the health of your soil. They are comparatively inexpensive. Most can be purchased on line or from a rural supplier near you.
Soil thermometer (Sub-soil temperature)
Refractometer (Brix Reading)
Penetrometer (Soil Compaction)
Soil Sampling Probe (Soil Profile)
Soil Microbiome Meter / EC meter (Electrical Conductivity, microbe presence)
Shovel (to check soil structure, root development, earthworms etc)
Metal / PVC tube about 100mm diameter and 100-150mm long (water infiltration)
Microscope / magnifying glass / camera (with zoom to view photos close up)
And a good nose to smell the soil!!!
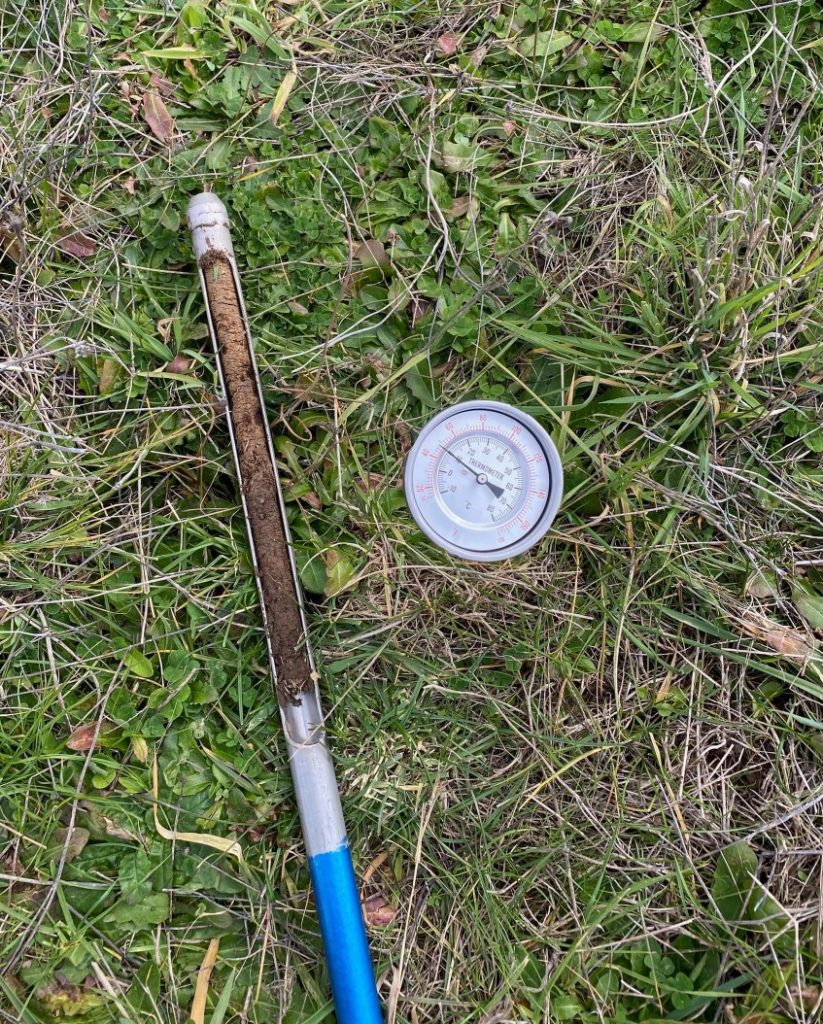
Soil Sampling Probe and Soil Thermometer in Action during Early Phase of Regeneration